
明日の天気が雨か晴れかによってアクションを起こせないか、という要望をとある掲示板で目にしたので調べたところ、お天気APIというのがあるのを知りました。
自分にはこれといって必要性はないものの、面白そうなので勝手に作ってみました。(特に周知せず)
参考にしたページ
天気予報 API (livedoor 天気互換)のJSONを表示させてみた
https://four4to6.x0.com/800/
【Python】無料で使える天気予報APIで降水確率を取得する
https://creepfablic.site/2021/11/14/python-weather-api/
step1:仮想センサーの増設
雨の場合と晴れの場合で別の定型アクションを動かそうと考え、「スイッチでAlexa定型アクションを起動~スキル作成編~」で作成した仮想センサーを増やしました。
詳細は以下を参照してください。ここでは簡潔に記述します。
スイッチでAlexa定型アクションを起動~スキル作成編~
https://km2-system.com/2022/06/28/alexa_switch_2/
スキルのAWS関数のindex.js内記載のセンサー数を増やします。
sensor_num=10 を sensor_num=30 に変更して「Deploy」します。(数値は必要数にします。自分の場合、他にもやりたいことがあるため、30まで増やしました)
Alexaアプリでデバイスの検出を行うと追加したダミーセンサーが検出されます。既にスキルが有効になっているのであれば無効/有効等の操作は必要ありません。
※デバイスの検出方法:Alexaアプリの[デバイス]タブで一番上の右側+ – [デバイスの追加] – [その他]
step2:pythonプログラム
プログラムは参照ページとほとんど同じですが、もし他の方が使うときに変更する可能性があるところを中心に若干の説明を書きます。
今回、雨の時に起動するセンサー番号は22、晴れの場合は23としました。
rain_sensor_no = 22
shine_sensor_no = 23
地点コードは以下から取得します。
https://weather.tsukumijima.net/primary_area.xml
札幌の地点コードは016010でした。
city_code = “016010” #札幌市
天気は日中の予報で判断します。6時から12時までの予報と12時から18時までの予報どちらかが30%以上の場合、雨と判断するようにしました。
threshold = 30
確認用に取得した天気情報はresponse.txtというファイルに保存しておきます。
response_file = ‘./response.txt’
仮想センサーの起動は「スイッチでAlexa定型アクションを起動~スキルテスト編~(https://km2-system.com/2022/06/29/alexa_switch_4/)」で作成したalexa_trigger.pyをちょっとだけ改造し、関数化してimport可能なファイルにしました。
仮想センサーを起動するプログラムは以下のalexa_trigger_func.pyファイルをimportし、センサー番号を引数に渡して関数alexa_trigger()を呼べば良いだけになります。
※client_ID = 、client_secret = にはスキルビルド画面のアクセス権限メニューから取得したAlexaクライアントIDとAlexaクライアントシークレットを貼り付けます。(index.jsと同じもの) 「スイッチでAlexa定型アクションを起動~スキルテスト編~」参照
alexa_trigger_func.py
import sys
import os
import json
import datetime
from trace import Trace
import requests

client_ID = ''
client_secret = ''
token_file = './token.txt'

def alexa_trigger(no):
  sensor_name = 'dummy_sensor_' + format(no, '0>3')
  # アクセストークンが有効かどうかチェックする
  access_token = ''
  access_token_valid = False
  if os.path.exists(token_file):
    #ファイル有、データ読み込み
    f = open(token_file)
    data = f.read()
    f.close()
    jdata = json.loads(data)
    expires = jdata['expires_in']
    f_time = os.path.getmtime(token_file)
    file_time = datetime.datetime.fromtimestamp(f_time)
    expiring_date = datetime.datetime.fromtimestamp(f_time + expires)
    today = datetime.datetime.today()
    if today < expiring_date:
      # アクセストークン有効、取得
      access_token_valid = True
      access_token = jdata['access_token']

  # アクセストークンが無効の場合はoa2サーバーから取得
  if not access_token_valid:
    header_str = {
      'Content-Type': 'application/x-www-form-urlencoded;Accept-Charset=UTF-8'
    }
    body_str = {
      "grant_type": "refresh_token",
      "refresh_token": refresh_token,
      "client_id": client_ID,
      "client_secret": client_secret
    }
    response = requests.post('https://api.amazon.com/auth/o2/token', data = body_str, headers = header_str)
    if response.status_code != 200 :
      print(response.status_code)
      exit()
    jdata = json.loads(response.text)
    access_token = jdata['access_token']
    if len(access_token) > 0:
      access_token_valid = True
      # ファイルに書き込み
      f = open(token_file, 'w')
      f.write(response.text)
      f.close()

  if not access_token_valid:
    print('can not get access_token')
    exit()

  # イベントゲートウェイにイベントを送信する
  message_id = sensor_name + '_' + str(today)
  timeOfSample = today.strftime('%Y-%m-%dT%H:%M:%S.00Z')
  header_str = {
      'Authorization': 'Bearer ' + access_token,
      'Content-Type': 'application/json'
  }
  json_str = {
    "event":{
      "header":{
        "namespace":"Alexa",
        "name":"ChangeReport",
        "messageId":message_id,
        "payloadVersion":"3"
      },
      "endpoint":{
        "scope":{
          "type":"BearerToken",
          "token":access_token
        },
        "endpointId":sensor_name
      },
      "payload":{
        "change":{
          "cause":{
            "type":"PHYSICAL_INTERACTION"
          },
          "properties":[
            {
              "namespace":"Alexa.MotionSensor",
              "name":"detectionState",
              "value":"DETECTED",
              "timeOfSample":timeOfSample,
              "uncertaintyInMilliseconds":0
            }
          ]
        }
      }
    },
    "context":{
      "properties": [
        {
          "namespace": "Alexa.EndpointHealth",
          "name": "connectivity",
          "value": {
            "value": "OK"
          },
          "timeOfSample": timeOfSample,
          "uncertaintyInMilliseconds": 0
        }
      ]
    }
  }

  response = requests.post('https://api.fe.amazonalexa.com/v3/events', json = json_str, headers = header_str)
  if response.status_code == 202:
    print('success')
  else:
    print(response)
天気を予報するプログラムは以下のようになります。
weather.py
import requests
import json
import alexa_trigger_func

city_code = "016010"    #札幌市
threshold = 30
rain_sensor_no = 22
shine_sensor_no = 23
response_file = './response.txt'

# URL
url = "https://weather.tsukumijima.net/api/forecast/city/" + city_code
try:
    # 天気予報取得
    response = requests.get(url)
    # 通信が正常でなければ例外発生
    response.raise_for_status()
except requests.exceptions.RequestException as e:
    # エラー処理
    res_text = "Error:{}".format(e)
    print(res_text)
else:
    res_text = response.text
    # json解析
    weather_json = response.json()
    # データ取得
    yesterday = weather_json["forecasts"][1]["date"]
    chanceOfRain1 = weather_json["forecasts"][1]["chanceOfRain"]["T06_12"]
    chanceOfRain2 = weather_json["forecasts"][1]["chanceOfRain"]["T12_18"]

    am_per = int(chanceOfRain1[:-1])
    pm_per = int(chanceOfRain2[:-1])
    if am_per >= threshold or pm_per >= threshold:
        alexa_trigger_func.alexa_trigger(rain_sensor_no)
    else:
        alexa_trigger_func.alexa_trigger(shine_sensor_no)
finally:
    # fileに保存
    f = open(response_file, 'w')
    f.write(res_text)
    f.close()
step3:起動される定型アクションの作成
雨の場合と晴れの場合でそれぞれ仮想センサーの検知に対応する定型アクションを作成します。
実行条件で[スマートホーム]から該当するダミーセンサーを選択します。
アクションはとりあえずアレクサが「明日は雨です」、「明日は晴れです」と喋るだけにします。
step4:pythonプログラムの動作確認
同じフォルダにweather.pyをalexa_trigger_func.pyを置き、以下のコマンドを打ち込み動作確認します。pythonがインストールされているならばlinuxでもWindowsでも動作します。
$ python weather.py⏎
Alexaが「明日は雨です」、「明日は晴れです」などと喋れば成功です。
response.txtの内容も確認します。
$ nano response.txt
step5:pythonプログラムの起動設定について
24時間起動したラズベリーパイにプログラムを置き、毎日決まった時間にプログラムを起動するようにします。
crontabなどlinuxのシステムでそれを実現することは可能ですが、メンテナンス性という観点ではAlexaアプリの定型アクションを使う方が良いと考えました。
時刻で起動する定型アクションからNode-REDを使ってpythonプログラムを起動します。全体の流れは以下のようになります。
定型アクション(時刻起動) -> Node-RED -> pythonプログラム -> (晴/雨)定型アクション
step6:Node-REDにデバイス作成
詳細は以下を参照して下さい。ここでは簡潔に書きます。
Alexaによる野球チャンネルの自動化2(Nature API)
https://km2-system.com/2022/06/13/auto_tv_channnel_2/
Node-RED Alexa Home Skill Bridgeのページ(https://alexa-node-red.bm.hardill.me.uk/)にログインします。
[Add Device]ボタンを押下して新しいデバイスを作成します。
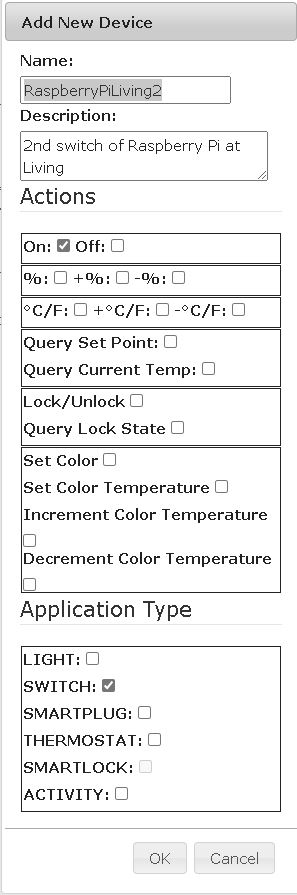
NameはここではRaspberryPiLiving2としました。
起動するだけなのでActionsにはOnだけにチェックします。
Action TypeはSWITCHにします。
[OK]ボタンを押下して設定します。
Alexaアプリでデバイスの検出を行い、Node-REDのデバイスを追加します。
step7:ラズベリーパイのNode-REDでフロー作成
ラズベリーパイにNode-REDをインストールしていない場合はインストールします。
※参照;Alexaによる野球チャンネルの自動化2(Nature API)
ブラウザを起動し、http://xxx.xxx.xxx.xxx:1880を開きます。xxx.xxx.xxx.xxxはラズベリーパイのIPアドレスです。ラズベリーパイでも別のPCからでも構いません。
Node-REDにalexa-home-skillを追加していない場合は追加します。
※参照;Alexaによる野球チャンネルの自動化2(Nature API)
パレットから[alexa-home]を配置し、追加したデバイス(上記の例ではRaspberryPiLiving2)を設定します。nodeの表示が[alexa-home] から[RaspberryPiLiving2]に変わります。
パレットから[exec]を配置し、[RaspberryPiLiving2]と繋げます。
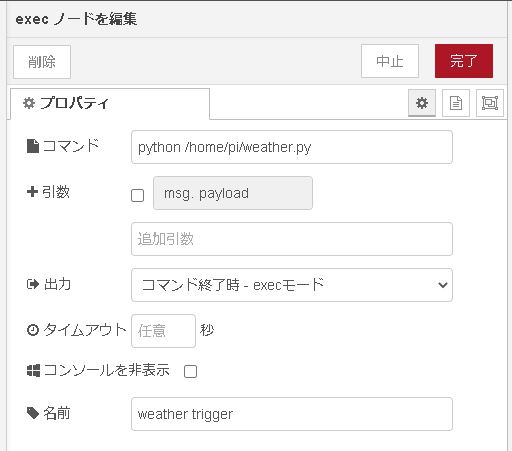
execノードをダブルクリックし、コマンドを設定します。
python /home/pi/weather.py ディレクトリ’/home/pi/’の部分は自分の環境に合わせます。
名前にweather triggerなどと入れ[完了]ボタンを押します。
「デプロイ」ボタンでフローを送信します。

step8:alexa定型アクションでフローの起動を設定
定型アクションを作成します。
実行条件の設定で[スケージュール]を選択し、[繰り返し]と[時刻]を設定します。
アクションを追加で[スマートホーム]-[全てのデバイス]-[RaspberryPiLiving2]を選択します。
私はこれを夜寝る時間に設定し、そろそろ寝るだよという合図に使っております。